
Learn the facts about ostomy care.
An Ostomy is a surgically created diversion for feces or urine after removal of part or all of the intestine or bladder. According to the United Ostomy Associations of America (UOAA), an estimated 750,000 Americans are living with an ostomy and 130,000 new ostomy surgeries occur in the United States annually.
 Due to the complex nature and labor intensity of ostomy management, many hospitals employ certified wound, ostomy, and continence nurses (CWOCN) as resource persons. Also known as WOC nurses, they have advanced education in these specialties. But even if your hospital has a nurse ostomy specialist (and especially if it doesn’t), you need to be able to care for patients who have an ostomy. This article will provide the nuts and bolts so you can do just that.
About ostomies
Whether temporary or permanent, an ostomy may be created for such indications as cancer, inflammatory bowel disease (Crohn’s disease or ulcerative colitis), trauma, bowel obstruction, and bowel perforation. Common types of diversions include ileostomy, colostomy, and ileal conduit. (See Understanding ileostomies, colostomies, and ileal conduits.) The diversion may be incontinent or continent; this article discusses incontinent diversions only.
Preoperative preparation and postoperative care are essential to helping patients with a new ostomy adapt to this major life event.
Preoperative preparation
Before surgery, the nurse ostomy specialist or another nurse meets with the patient and home caregiver to provide information and support and to assess for an optimal surgical site for stoma creation. This critical session also provides an opportunity for patients to express their thoughts and feelings about the upcoming surgery and ostomy.
Postoperative care
After surgery, you’ll need to identify which type of ostomy the patient has, its indication, and whether it’s temporary or permanent. This information helps you gauge the patient’s overall health status, guide interventions, and determine educational needs. If necessary, you may need to check another source, such as the operative notes, to get answers to these questions. (Note: You can’t determine the type of ostomy a patient has based just on its abdominal location.)
You also need to understand various ostomy appliances and accessories, how to assess the patient, and principles of emptying and changing the pouch.
Ostomy appliances
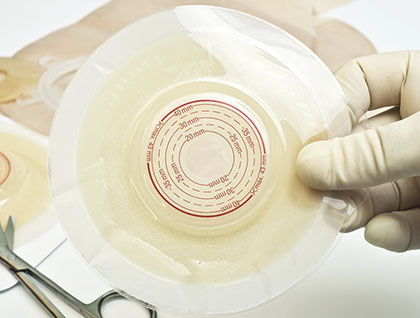
The nurse ostomy specialist chooses the initial appliance (pouching system) after measuring the stoma. (Measurement devices are available from appliance companies.) At each appliance change, you should measure the stoma because swelling may change its size or position. Swelling typically subsides over the first 6 weeks after surgery.
Wear time may vary; in most cases, it’s 5 to 7 days for a colostomy and 3 to 4 days for an ileostomy or ileal conduit. After the first 6 weeks, the patient may change to a different appliance with professional guidance.
The ostomy appliance consists of a skin barrier and pouch to contain fecal or urine effluent. (See Types of skin barriers.) Disposable and waterproof, the appliance is designed to contain odor and has either a drainable clamp or Velcro closure or is a nondrainable closed-ended pouch.
Some appliances are clear; others are opaque. An opaque appliance may make it difficult to center the pouch directly over the stoma. All pouching systems are equally effective, so the choice depends largely on patient preference.
The ostomy appliance may have one or two pieces.
- A one-piece system has a single seal, with the skin barrier permanently attached to the pouch. Appropriate for patients with a flat peristomal profile, it entails one less application step than a two-piece system.
- With a two-piece system, the pouch can be detached from the skin barrier and discarded instead of emptied. However, it requires an extra step—re-attaching the pouch to the skin barrier.
Types of skin barriers
| Skin barriers have either a cut-to-fit opening or a stretch-back opening to accommodate the stoma. The opening should match stoma size and shape; the barrier should be flush with the stoma to prevent undermining of the skin from effluent. |
 |
| • With a cut-to-fit opening, the clinician cuts an opening from the starter hole so it just clears the stoma, then peels off the starter-hole piece and uses it as a pattern for future pouch changes. |
 |
| • A stretch-back opening eliminates the need to measure, cut, or rely on a pattern. It’s ideal for patients unable to use both hands and those with weakness or dexterity issues. No matter how much or how little the opening is stretched, it conforms snugly around the stoma. |
Ostomy accessories
Various ostomy accessories promote comfort, adherence, and healthy peristomal skin. Skin-barrier paste and powder, as well as barrier rings, wafers, and strips, are made from adhesive pectin. Skin-barrier prep and powder are available as sprays, wipes, or “lollipop” sticks. Applied directly to skin around the stoma before barrier or pouch application, they protect the skin by preventing effluent from leaking and touching the skin under the appliance. (Caustic stool enzymes in effluent can harm peristomal skin.)
Clinicians must read all manufacturer directions before using these products. If peristomal skin is denuded (a condition called epidermal skin stripping), powder can be sprinkled directly on the denuded skin and sealed by dabbing at it with the corner of skin-barrier film prep—a technique called crusting.
Other ostomy accessories include:
- ostomy belts, which help secure the appliance
- binders, which support a peristomal hernia
- wraps, which can provide a flatter body contour
- special swimwear and intimate apparel that allows for privacy.
Patient assessment
When assessing the patient with a new ostomy:
- inspect the appliance to verify that it’s secure and functioning properly
- check for effluent leakage
- note the date of the last pouch change
- evaluate output character and volume
- check for flatus.
When emptying and changing the pouch, inspect the stoma, noting its anatomic location and proximity to drains or the surgical incision, as well as stoma characteristics and peristomal skin condition. Normally, the stoma is red, moist, and firm and protrudes 2.5 cm (1 inch) above the skin surface. The opening should point directly upward.
Stoma shape and size depend on how the stoma was created and its location in the GI tract. Stomal discoloration, inadequate output, absent or diminished bowel sounds, and abdominal distention or tenderness may indicate stomal dysfunction, poor perfusion, or both. If these signs or symptoms occur, a surgical consult may be necessary. Be aware that slight bleeding may occur with gentle cleansing because stomal mucosal tissue has a rich blood vessel supply.
Emptying and changing the pouch
The pouch should be emptied when it’s one-third to one-half full. In a high-volume system, such as a new ileostomy or ileal conduit, an appliance with an output spout may be connected by a conduit connection to a urinary leg-bag drainage system, allowing for a larger reservoir and less frequent changes.
Ideally, patients should empty the pouch while standing at or sitting on a toilet with their legs open. Patients with impaired mobility may lie on their side and drain the pouch into a urinal or wash basin, then dispose of the output in a toilet.
Basic pouches should be changed at least weekly or whenever leakage occurs. High-volume output systems, such as ileostomies and ileal conduits, need to be changed more often. (See Changing the ostomy appliance.)
Changing the ostomy appliance
|
Educating patients and home caregivers
The initial phase of a new ostomy can be overwhelming for patients and caregivers. To build their confidence, work closely with them, conveying confidence and patience. Teaching points to cover include ostomy type, expected output, the need to alert nursing staff of leakage or seal compromise, and the importance of emptying the pouch when it’s one-third to one-half full. Also teach patients and caregivers about an appropriate diet to follow. (See Dietary considerations.)
Determine the patient’s readiness to learn about the ostomy. For patients who won’t look at or touch the pouch, use a gradual, supportive, step-by-step approach. For those who seem receptive to seeing, touching, and learning about the pouch, explain the role of each ostomy item and urge the patient to touch and practice with these items. (Manufacturer-supplied ostomy models can aid this process.) Once the patient is comfortable with the pouch, demonstrate a pouch change; if the patient expresses readiness, he or she may participate.
At the next pouch change, encourage the patient to perform a return demonstration with coaching. Have the patient open and close a sample pouch, attach a pouch to a skin barrier, and practice emptying his or her own pouch. Reassure patients that their appliance will adhere successfully even if challenges occur at first.
Many patients and caregivers are far less anxious after the return demonstration. At subsequent pouch changes, supervise or help the patient or caregiver, as needed.
At discharge, the patient should be able to empty the pouch independently. Otherwise, explore alternatives, such as a family member or caregiver, who can help the patient. Provide written materials, resource information, and peer-support referral, all available from the UOAA, Wound Ostomy and Continence Nurses Society, and Ostomy Secrets. As appropriate, arrange for a home health nursing referral for additional support. Other helpful resources include ostomy clinics and certified ostomy nurses who practice in the community; for information on the latter, contact the WOCN Society.
Dietary considerations
Most patients can resume a normal diet after ostomy surgery but should limit their intake to small, frequent meals with low fiber intake for the first 2 weeks (due to bowel edema). Encourage them to chew foods thoroughly to maximize healthy digestion. During the initial high-volume effluent period, an ileostomy must be monitored closely because of the risk of fluid and electrolyte imbalances. Patients with loose stools may benefit from stool-thickening foods, such as applesauce, bananas, rice, peanut butter, and bread. They should chew these foods, particularly those high in fiber, thoroughly to avoid bowel blockage. Patients with ileal conduits don’t require dietary modification but should drink plenty of fluids, especially water, to help prevent mucus buildup in the urine. Know that certain foods and beverages, including dairy foods, onions, cabbage, broccoli, mushrooms, beans, cucumbers, and alcohol, may trigger gas. Gas causes the pouch to expand; to release gas, instruct the patient to open the pouch at the flange (where the pouch and skin barrier connect). To help reduce gas, advise patients to avoid chewing gum, drinking carbonated beverages, and using beverage straws. |
From anxiety to empowerment
Patients with new ostomies face an initial period of challenging psychological and social adjustments. Major concerns include altered self-image, fear of rejection, intimacy changes, and fear that the ostomy appliance will lose adherence in a public or social situation.
Provide emotional support and urge patients to express feelings of anxiety and fear. Teach them how to take control of their situation to improve their quality of life. With emotional support, information, and practice, ostomy patients can feel empowered and achieve positive outcomes.
The authors work at the Shirley Ryan AbilityLab, the former Rehabilitation Institute of Chicago, in Illinois. Mary H. Zeigler is a clinical nurse specialist. Allison Min is a staff nurse.
Selected references
Colwell JC. Selection of pouching system. In: Carmel JE, Colwell JC, Goldberg MT, eds. Wound, Ostomy and Continence Nurses Society® Core Curriculum: Ostomy Management. Philadelphia: Lippincott Williams and Wilkins; 2016:120-30.
Cross HH, Roe CA, Wang D. Staff nurse confidence in their skills and knowledge and barriers to caring for patients with ostomies. J Wound Ostomy Continence Nurs. 2014;41(6):560-5.
Prinz A, Colwell JC, Cross HH, Mantel J, Perkins J, Walker CA. Discharge planning for a patient with a new ostomy: Best practice for clinicians. J Wound Ostomy Continence Nurs. 2015;42(1):79-82.
Recalla S, English K, Nazarali R, Mayo S, Miller D, Gray M. Ostomy care and management: A systematic review. J Wound Ostomy Continence Nurs. 2013;40(5):489-500.
Stricher L, Hocevar B, Asburn J. Fecal and urinary stoma construction. In: Carmel JE, Colwell JC, Goldberg MT, eds. Wound Ostomy and Continence Nurses Society Core Curriculum: Ostomy Management. Philadelphia: Lippincott Williams and Wilkins; 2016:90-8.
United Ostomy Associations of America. Phoenix magazine.
Zeigler M. How do we promote independent ostomy management for people with disability? Rehabil Nurs. 2012;37(2):53-5.


1 Comment.
I am responding to an article published in volume 12, issue 9 of American Nurse Today, entitled “Ostomy Management: Nuts and Bolts for Every Nurse’s Toolbox” by Mary Zeigler and Allison Min. I found the article to be a needed refresher for bedside nurses. No matter the specialty, it is imperative that nurses be familiar with the fundamentals of ostomy care. I have encountered many complex ostomy situations during my career. A common complication encountered with ostomies were peristomal skin breakdown. Peristomal skin breakdown occurs when feces come into contact with the skin surrounding the stoma. Peristomal skin breakdown made it difficult to achieve a skin barrier and skin-to-device seal. Thank you, authors, for introducing me to the “crusting” method. I will research the technique and incorporate it into my practice when dealing ostomies.
I agree that a thorough education of patients and caregivers are imperative to the successful outpatient management of ostomies. Support from the interdisciplinary team can help with identifying potential risks that could lead to future complications with the ostomies. Additionally, the article covered proper assessment of the ostomy as well as nutrition pointers. I encourage all bedside nurses to read this article because we all encounter ostomy patients.
Thank You,
Candace S. Hammond, BSN RN CCM
President-Elect New Orleans District Nurses Association
RN Case Manager